Planting Flowers for Beginners: A Simple First-Garden Guide
Everything you need to know to start your very first flower bed without getting overwhelmed. Learn how to evaluate sunlight, check soil drainage, understand annuals versus perennials, decode nursery tags, and keep plants alive through their first 30 days.
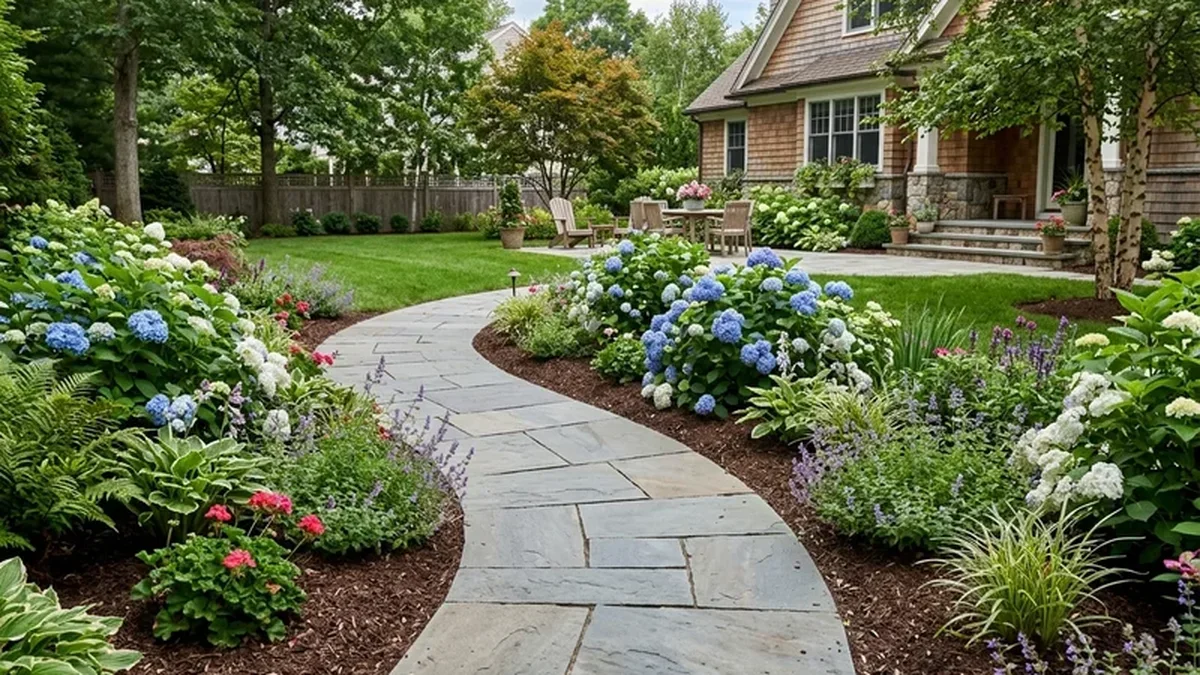
Direct Answer: How to Start Planting Flowers as a Beginner
The secret to beginner gardening success is not having a "green thumb"—it is following the fundamental horticultural rule: Right Plant, Right Place. A flower described on social media as "impossible to kill" will still perish quickly if placed in the wrong sunlight, waterlogged clay, or sub-freezing weather.
Your First Flower Bed in 10 Steps
Follow this step-by-step roadmap to go from bare ground to a thriving, colorful flower bed:
Pick a Small, Manageable Location
Start with one simple 3×6 ft bed or patio container so you can observe growth and water without getting overwhelmed.
Track Your Sunlight Hours
Check the spot at 8 AM, 12 PM, and 4 PM. Full sun requires 6–8+ hours; part sun needs 4–6 hours; shade gets under 4 hours.
Check Soil Texture & Drainage
Ensure water drains within 12–24 hours; avoid persistently waterlogged depressions. Get a county Extension soil test before amending.
Know Your Local Frost Window
Identify your average last spring frost date. Never plant tender summer flowers into cold soil before frost risk is gone.
Decide: Annuals vs. Perennials vs. Bulbs
Annuals bloom all summer for 1 year; perennials return for 3+ years but bloom for 3–6 weeks; bulbs provide early spring color.
Choose 3 to 5 Compatible Plants
Pick flowers whose light and moisture needs match your site. Repeat groupings of 3 or 5 for a cohesive designer appearance.
Decode the Nursery Plant Tag
Check mature spread and height, hardiness zone, and water requirements before purchasing. Never buy flowers by color alone.
Arrange Plants by Mature Height
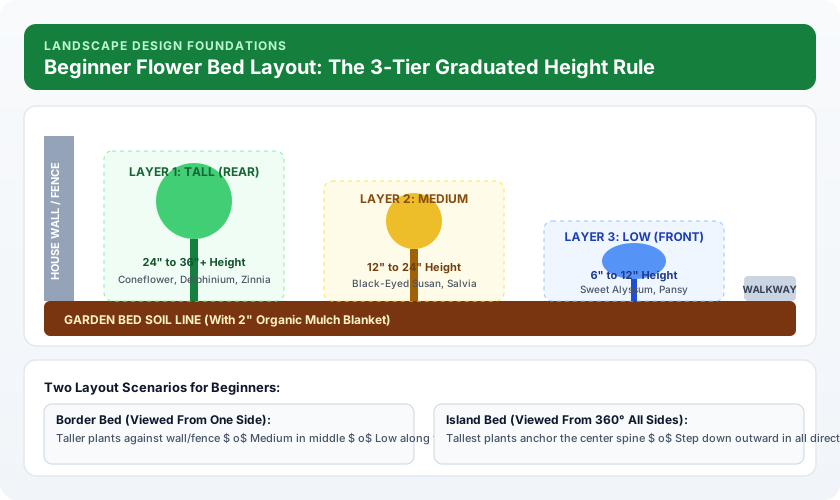
Place tall flowers (24–36"+) in the rear, medium flowers (12–24") in the middle, and low mounding edgers (6–12") in the front.
Plant at the Correct Root-Ball Depth
Dig holes twice as wide as the pot but exactly the same depth. Never bury plant crowns deeper than they sat in their nursery pots.
Water, Mulch, & Observe for 30 Days
Soak root balls immediately. Spread 2 inches of hardwood mulch (leaving a gap at plant stems). Water deeply only when top 2 inches dry.
1. Start With a Small Flower Bed
The most common mistake new gardeners make is biting off more than they can chew. Transforming an entire front lawn, preparing a 50-foot foundation border, or buying 25 different plant varieties on your first weekend leads to exhaustion, neglected weeds, and watering burnout.
For your very first year, create a single modest bed—approximately 3 feet deep by 6 to 10 feet long (about 20 to 30 square feet). A small plot allows you to observe plant growth, weed pressure, soil drying cycles, and flowering habits without becoming overwhelmed.
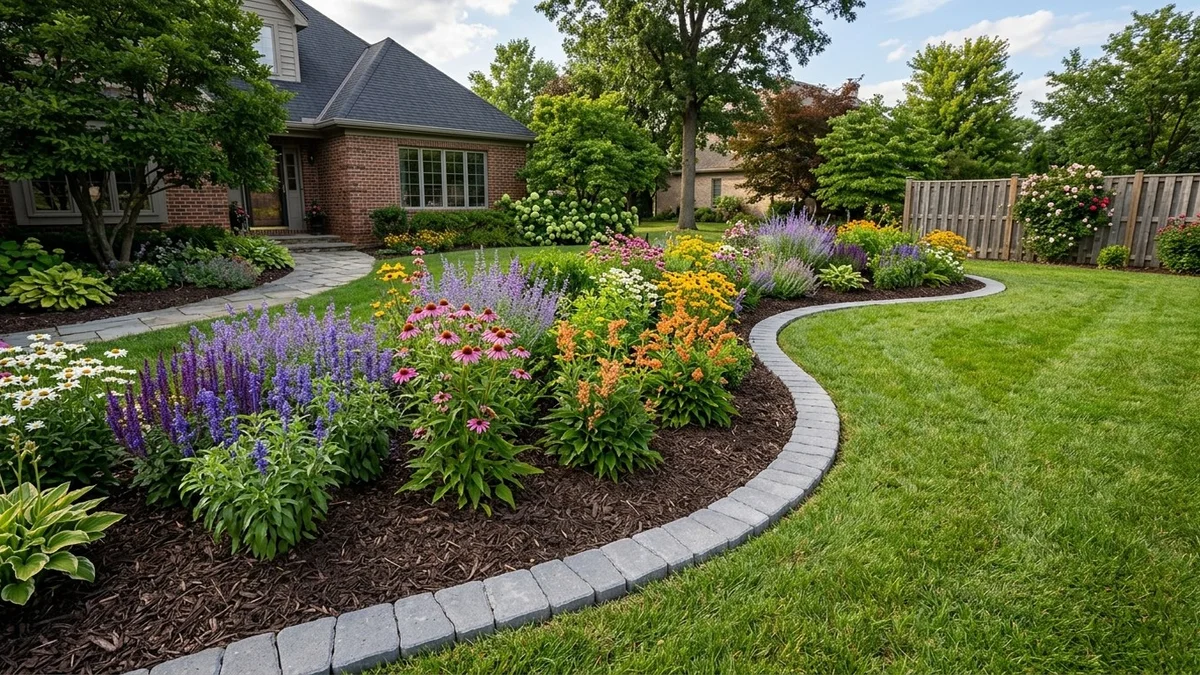
If you live in an apartment, rent your home, or have impenetrable rocky clay, you don't even need to dig up the ground. A single 16-to-20-inch outdoor planter on a sunny patio or porch makes a fantastic learning garden.
Key Container Difference (UMN Extension): Soil in containers dries out much faster than in-ground garden beds because root zones are exposed to warm ambient air on all sides. During midsummer heat, container flowers often require daily watering, whereas in-ground beds need watering only once or twice a week.
2. Figure Out How Much Sun You Have
Sunlight is the primary fuel that powers photosynthesis, stem strength, and flower bud formation. You cannot guess how much sun a spot gets based on how bright it feels to your eyes. You must observe direct, unobstructed sunlight hitting the soil over the course of a normal sunny day.
According to University of Georgia (UGA) Cooperative Extension, garden sunlight falls into three standard botanical tiers:
- Full Sun (6 to 8+ Hours): Receives direct, unfiltered rays for the majority of the day. Necessary for classic blooming annuals like zinnias, marigolds, and sunflowers, as well as native perennials like coneflowers.
- Part Sun / Part Shade (4 to 6 Hours): Receives direct sun for part of the day. Morning sun with afternoon shade is the most gentle and productive form of partial exposure.
- Shade (Less than 4 Hours): Direct sunlight rarely touches the soil; the area relies on ambient, reflected, or dappled light under dense tree canopies or north-facing walls.
Check Your Flower Bed's Sunlight
Step outside on a clear day and click which times your proposed flower bed receives direct, unobstructed sunlight on the soil:
This spot receives 4 to 6 hours of direct sun. Ideal for flowers that want brightness but benefit from protection during the hottest hours.
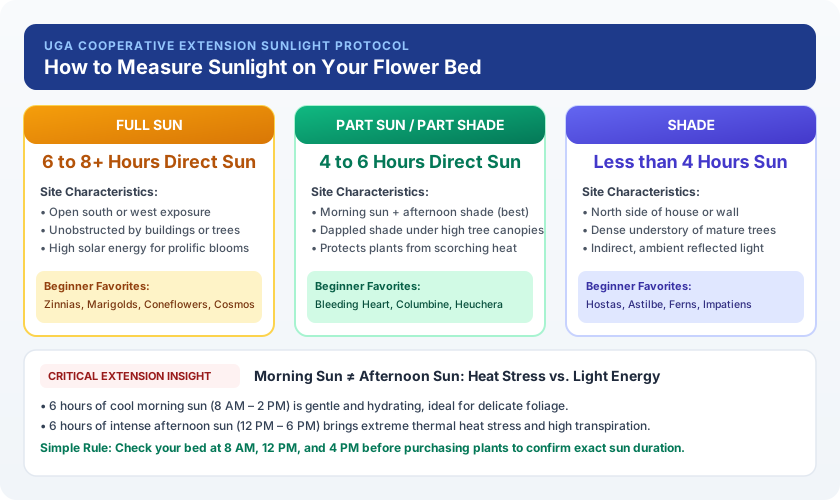
Six hours of cool morning sun (8:00 AM to 2:00 PM) delivers vital photosynthetic energy while ambient temperatures remain low, allowing plants to photosynthesize with minimal moisture loss. Conversely, six hours of blistering afternoon sun (12:00 PM to 6:00 PM) subjects plants to high heat and intense transpiration stress. In hot southern climates, even many "full sun" plants perform best when sheltered from late afternoon scorching rays.
3. Check Your Soil and Drainage
Plants absorb water, oxygen, and dissolved minerals through their root systems. If your soil holds standing water for days after a rainstorm, root hairs drown due to oxygen starvation. Conversely, if your soil is pure coarse sand, water drains through instantly before roots can drink.
The 10-Minute Drainage Test: Dig a hole 10 to 12 inches deep in your proposed bed. Fill it completely with water and let it drain. Fill it a second time and time how long it takes to empty.
- Ideal Drainage: Drains at 1 to 2 inches per hour (empty within 6 to 12 hours). Perfect for 90% of garden flowers.
- Slow / Poor Drainage: Water remains in the hole after 24 hours. Indicates compacted subsoil or heavy clay; choose water-tolerant species or build a raised bed.
- Excessive Drainage: Empties in under 15 minutes. Pure sand or rubble; will require frequent irrigation and organic matter.
Penn State Extension cautions beginners against dumping random chemical fertilizers or bags of lime into a new flower bed without testing first. A basic $10–$20 soil test kit from your county Cooperative Extension office analyzes your soil's pH (ideal for most flowers is slightly acidic to neutral, pH 6.2–6.8) and baseline phosphorus and potassium levels, telling you exactly what your ground actually needs.
4. Know When It's Safe to Plant
Do not rely on informal folklore like "plant on Mother's Day." Mother's Day arrives weeks after frost risk has passed in Atlanta, GA, but weeks before the final frost in Burlington, VT or Flagstaff, AZ.
The definitive biological timing anchor for outdoor planting is your Local Average Last Spring Frost Date. According to University of Illinois Extension, annual flowers divide into three distinct cold-tolerance groups:
Tolerates freezing soil down to 25°F–28°F. Examples: Pansies, Sweet Peas, Larkspur.
Tolerates light frosts down to 30°F–32°F and cool soil. Examples: Snapdragons, Sweet Alyssum, Petunias.
Foliage turns black and collapses at 32°F; soil must reach 65°F+. Examples: Zinnias, Marigolds, Cosmos, Impatiens.
5. Decide What Kind of Flowers You Want
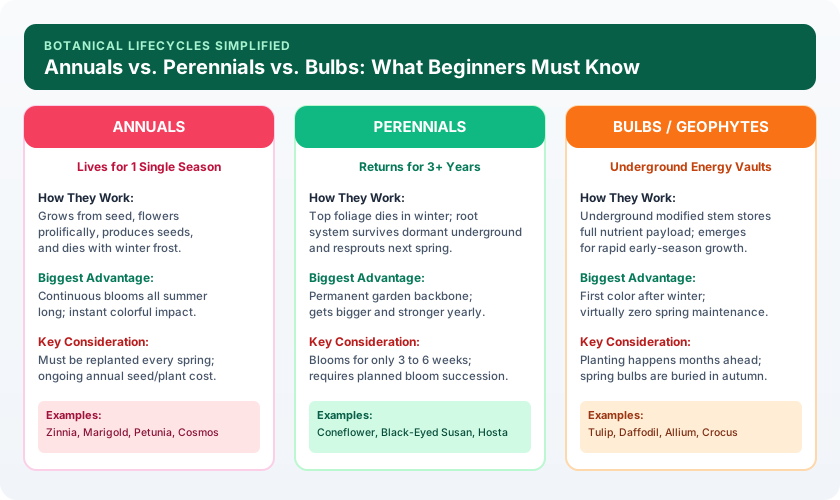
Understanding plant lifecycles prevents the disappointment of expecting an annual to return or expecting a perennial to bloom for five months straight. Review this comparison before visiting the nursery:
| Flower Category | Lifespan & Behavior | Biggest Advantage | Main Consideration | Best Beginner Role |
|---|---|---|---|---|
| Annuals | 1 growing season (seed $\to$ flower $\to$ seed $\to$ death) | Continuous non-stop blooms from late spring until fall frost | Must be replanted every spring; ongoing annual plant cost | Filling empty beds quickly, patio containers, bold summer color |
| Perennials | 3 to 10+ years (roots survive winter, resprout every spring) | Permanent structural investment; gets larger and stronger yearly | Individual species bloom for 3–6 weeks; needs staggered bloom planning | Long-term garden bed framework, pollinator habitats, border spines |
| Bulbs / Geophytes | Multi-year underground nutrient vaults (dormancy $\to$ bloom $\to$ recharge) | First vibrant blooms of spring; emerges through snow with zero care | Planting occurs months ahead (fall planting for spring blooms) | Under-planting beneath perennials, spring walkway borders |
| Tender Perennials (Grown as Annuals) | Perennial in frost-free tropics (Zones 10–12); annual in Zones 3–9 | Vigorous summer growth and high heat/drought tolerance | Label says 'perennial' but winter freezes will kill it in cold zones | Petunias, Begonias, Coleus, Calibrachoa, Lantana |
6. Choose Beginner-Friendly Flowers for Your Site
There is no such thing as an "impossible-to-kill" flower. Even tough zinnias die in deep shade, and durable hostas shrivel under midday desert sun. However, certain species possess wide tolerances for minor beginner mistakes, such as imperfect soil or brief dry spells.
Review these vetted, non-invasive selections categorized by site conditions:
Extremely fast from seed or transplant; flowers profusely all summer in hot sun.
Highly tolerant of poor soils, drought-hardy, repels insect pests, continuous blooms.
Tough native perennial (Zones 3–9); deep taproot resists drought and neglect.
Prolific golden-yellow daisies that tolerate humidity, clay soil, and summer heat.
Feathery delicate foliage with daisy blooms; thrives even in nutrient-poor garden soils.
Low-growing carpet of honey-scented blooms; perfect for bed edges and containers.
Waxy succulent leaves resist drought; blooms consistently in dappled shade borders.
Grown primarily for spectacular purple, amber, and lime-green foliage (Zones 4–9).
Virtually indestructible foliage plant; fills dark shade under tree canopies (Zones 3–9).
7. Read the Plant Tag Before You Buy
When walking into a garden center, the explosion of bright colors is overwhelming. Impulse buying based solely on flower color is the number one cause of dead plants in June.
Treat the plastic tag inserted into the nursery pot like a nutritional label. It contains every critical specification needed to keep the plant alive:

- Check Sunlight First: If you have 4 hours of sun, discard full-sun tags immediately.
- Check Mature Height & Spread: Ensure the plant won't block walkway sightlines or crowd its neighbors.
- Verify Hardiness Zone: If buying a perennial, ensure your location falls within its listed USDA range.
- Choose Color Last: Only after the biological requirements match should you pick pink, purple, or yellow blooms.
8. Arrange the Flowers Before Planting
Never dig holes and plant flowers as you take them out of your vehicle. Penn State Extension recommends staging potted plants directly on the prepared bed surface while they are still in their nursery containers. Step back 15 feet to the street or walkway and evaluate the arrangement.
The 3-Tier Layering Formula:
- Rear Layer (Back): Tall flowers (24–36"+ height) like coneflowers, delphiniums, and tall zinnias.
- Middle Layer (Center): Medium-height bushy flowers (12–24") like black-eyed susans, salvias, and marigolds.
- Front Layer (Edge): Low mounding varieties (6–12") like sweet alyssum, pansies, or dwarf begonias that spill over borders.

9. Prepare the Flower Bed and Dig Holes
Preparing a small flower bed does not require dangerous rototillers or toxic chemical sprays. Simple hand tools—a flat-edge spade and hand trowel—are all you need for your first bed:
- Cut Crisp Edges: Slice a 3-to-4-inch deep vertical trench around the bed boundary using your spade. This "English edge" severs invading grass runners and creates a clean visual border.
- Remove Existing Turf / Weeds: Slice beneath sod patches to lift grass roots cleanly. Do not bury aggressive perennial weeds like dandelion or crabgrass.
- Dig the Correct Hole: Dig each hole twice as wide as the nursery container, but exactly the same depth as the pot.
Never bury plants deeper than they sat in their nursery pots. Planting 2 inches too deep suffocates root crowns and invites fungal collar rot. The top surface of the root ball must sit completely flush with the surrounding garden soil.
10. Water, Mulch, & Maintain Consistently
Once your plants are gently settled into their holes and soil is firmed around root balls:
- Initial Deep Soak: Immediately give each newly planted flower a gentle, thorough soaking (about 1/2 to 1 gallon of water per plant) to collapse subterranean air pockets and connect root hairs with native soil.
- Apply 2 Inches of Mulch: Spread clean, undyed organic hardwood mulch across exposed dirt between plants. Mulch keeps soil cool in summer, suppresses weed germination, and cuts your watering frequency in half.
- Avoid Mulch Volcanoes: Maintain a 1-to-2-inch open air ring around the base of every plant stem. Piling mulch against soft stems causes bacterial rot.

Week-by-Week Care During the First 30 Days
- Check soil moisture around root balls every morning with your finger.
- Water gently at the base if the top 1 inch feels dry; keep original root ball moist.
- Expect mild midday leaf wilt when temperatures exceed 75°F; plants should perk back up by evening.
- NEVER add synthetic fertilizer this week; tender stressed roots will burn.
- Transition from daily watering to soaking every 2 to 3 days depending on rainfall and heat.
- Conduct a gentle 'tug test': lightly hold the plant base and give a tiny upward pull. If it resists, roots are anchoring!
- Walk the bed and hand-pull any tiny weed seedlings sprouting through the mulch before they establish deep roots.
- Check that mulch has not washed against plant crowns during heavy rainfall.
- Look for bright lime-green new leaves emerging from the central growing tips.
- Water deeply and less frequently (1 to 2 times weekly) to encourage roots to dig deep into the subsoil.
- If zinnia or marigold seedlings look tall and single-stemmed, pinch off the top 1/2 inch to stimulate bushy branching.
- Verify that mulch layer remains at an even 2-inch thickness across open soil.
- First flower buds open into full blooms. Take photos of your new flower garden!
- Snip off faded or browned flower heads (deadheading) on annuals to redirect plant energy into fresh bud formation.
- Plants are now officially established and can rely primarily on natural rainfall plus supplemental watering during hot dry spells.
- Assess overall layout: note which flowers love the site and which might need slightly more or less sun next season.
5 Simple Starter Flower-Garden Layouts
5 Simple Starter Flower Garden Plans
Select a template below to view its dimensions, 3-tier plant layering, and realistic spacing. These serve as design frameworks rather than rigid rules—adjust species based on your local climate.
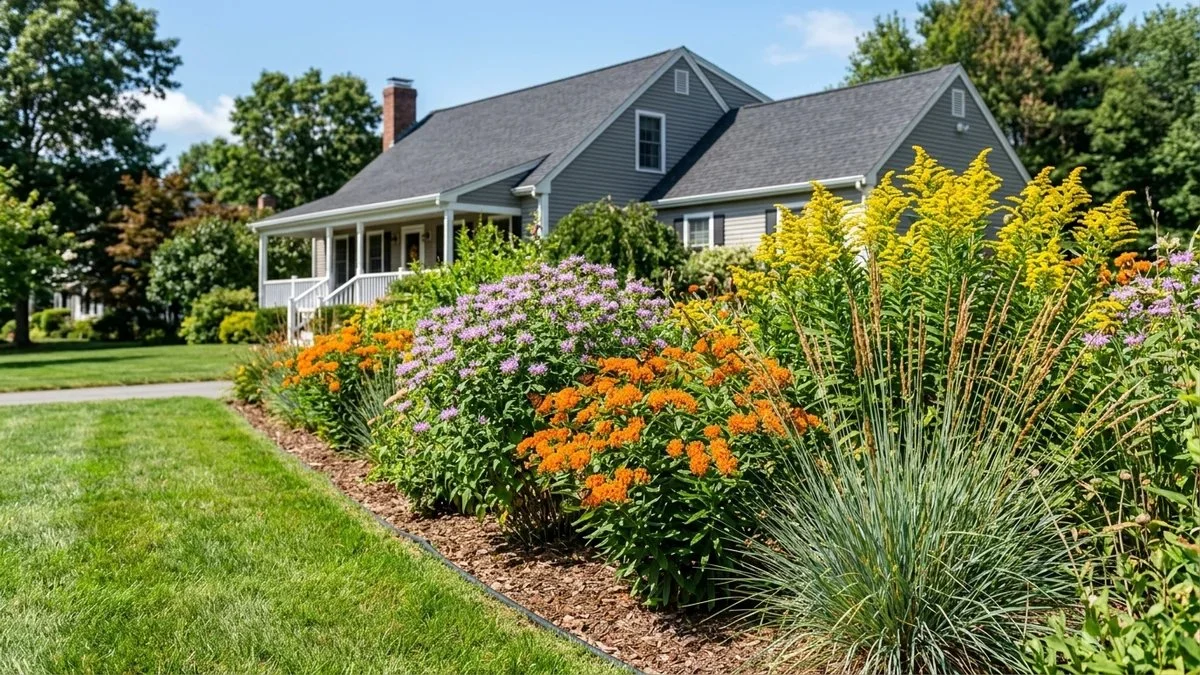
Plan A: The 3-Tier Sunny Walkway Bed
Structured 3-tier plant arrangement by mature sizeTall vertical flowering perennials that frame the background.
Sturdy, bushy blooming perennials that bridge height and provide late summer flowers.
Low cascading annual flowers that spill gently onto pavers or lawn edge.
Water root balls weekly for first 3 weeks; deadhead marigolds weekly for continuous flowers; cut back coneflowers in late winter.
20 Costly Beginner Flower-Gardening Mistakes to Avoid
Every experienced gardener has lost plants. By learning these 20 common traps ahead of time, you protect your budget, save hours of frustration, and enjoy a vibrant flower bed all season:

Buying Flowers Before Checking Sunlight
Why It Fails: Homeowners fall in love with blooming flowers at the nursery and buy them without knowing if their yard gets sun or shade. Sun-loving flowers rot and stop blooming in shade; shade plants get scorched with brown, crispy sunburn in direct sun.
Crowding Plants for Instant Fullness on Day 1
Why It Fails: Beginners dislike seeing open mulched space between small 4-inch nursery pots and plant them tightly edge-to-edge. By July, plants choke each other for light and nutrients, air circulation drops to zero, and leaves develop severe powdery mildew.
Choosing Flowers Solely by Bloom Color
Why It Fails: Selecting plants like paint swatches based on flower color while ignoring climate hardiness, mature size, and soil needs. Mismatching plants with site conditions leads to fast plant death regardless of how pretty the blossom was at the register.
Planting Too Early in Spring Before Frost Danger Passes
Why It Fails: The first warm 70°F weekend in March or April lures beginners into buying tender greenhouse annuals. A normal late spring frost drops temperatures to 30°F, turning tender impatiens, begonias, and zinnias into black mush overnight.
Treating USDA Hardiness Zone as a Planting Calendar
Why It Fails: Beginners assume 'Zone 7' means they can plant flowers in March, confusing winter hardiness with spring frost dates. Frost mortality; high elevation areas (e.g. Reno, NV) share Zone 7 with coastal areas (e.g. Richmond, VA) but have frost 6 weeks later.
Buying 20 Unrelated Plants (The 'Impulse Confetti' Trap)
Why It Fails: Buying one single pot of 20 different flowers because each looks charming individually. The flower bed looks chaotic, messy, and disjointed; each individual plant has conflicting watering and light needs.
Assuming Every Perennial Blooms All Summer Long
Why It Fails: Beginners expect perennials to behave like petunias and produce non-stop flowers for 5 consecutive months. Frustration when the perennial finishes blooming in June, leaving only green foliage for the remainder of the summer.
Assuming Annuals Will Return Every Year
Why It Fails: New gardeners are surprised when their marigolds, zinnias, and petunias do not grow back the following spring. Empty flower beds and confusion over plant lifecycles.
Watering on a Rigid Daily Timer Regardless of Weather
Why It Fails: Setting a sprinkler or hose timer to run every single morning for 15 minutes, even after 2 inches of torrential rain. Roots drown in oxygen-deprived soil, leading to root rot, fungal blight, and yellowing foliage.
Shallow Sprinkling Instead of Deep Soaking
Why It Fails: Holding a spray hose over flower tops for 60 seconds every evening. Only the top 1/4 inch of mulch gets wet; roots stay shallow and bake in the summer sun, causing severe drought vulnerability.
Creating 'Mulch Volcanoes' Around Plant Crowns
Why It Fails: Mounding thick mulch right up against soft plant stems thinking it offers extra protection. Trapped moisture rots the plant stem collar, provides cover for burrowing rodents, and suffocates the plant crown.
Adding Heavy Fertilizer to Stressed New Transplants
Why It Fails: Beginners think fertilizer is 'plant food' and douse newly planted, wilting flowers with synthetic chemicals. High salt concentrations in fertilizer pull moisture out of delicate roots, causing lethal fertilizer burn and root death.
Planting Container Flowers Too Deeply
Why It Fails: Digging a deep hole and burying the root ball several inches below the garden grade. The plant's root crown suffocates without air, causing crown rot and fungal collar decay.
Letting Patio Containers Dry Out Repeatedly
Why It Fails: Treating container pots like in-ground beds and watering only once a week. Container soil shrinks away from pot walls; water channels straight down the sides without wetting the root ball.
Using Garden Pots Without Drainage Holes
Why It Fails: Buying decorative ceramic or tin planters that lack holes in the bottom, assuming roots will drink all the water. Water pools at the bottom of the pot, creating an anaerobic stagnant swamp that drowns roots in days.
Tucking Tall Plants in Front of Short Flowers
Why It Fails: Placing plants randomly in the bed without checking mature height specifications. Tall 3-foot zinnias block the view of 6-inch sweet alyssum, stealing their sunlight and hiding them completely.
Planting Aggressive Invasive Flowers Nationally
Why It Fails: Buying flowers marketed online as 'fast-growing' or 'easy' without checking local invasive plant lists. Plants like Japanese Barberry, English Ivy, or certain morning glories take over entire beds and escape into local native ecosystems.
Expecting a Brand-New Perennial Bed to Look Fully Mature in Year 1
Why It Fails: Comparing a newly planted first-year garden to photos of 10-year-old established botanical estates. Disappointment and the temptation to over-fertilize or overcrowd with extra plants.
Using Landscape Fabric Beneath Annual Flower Beds
Why It Fails: Thinking landscape fabric permanently eliminates weeds in annual and perennial planting beds. Fabric prevents natural organic matter from enriching soil, restricts perennial crown spread, and weeds sprout in mulch on top anyway.
Over-Complicating Your First Flower Garden
Why It Fails: Trying to build a 200-square-foot cottage garden with drip irrigation, 30 plant varieties, and complex soil recipes on Day 1. Burnout, fatigue, weed overrun, and abandonment of the gardening hobby.
Want to see your flower bed layout before buying plants?
Upload a front-yard photo into our AI Landscape Design Generator to visualize curved bed shapes, mulch borders, and plant groupings. Note: AI visualizers show layout aesthetics; they cannot test your actual soil drainage, sunlight hours, or frost dates.
Beginner Flower Gardening: Answers to Top Homeowner Questions
Answers
Frequently asked questions
01How do I start planting flowers as a beginner?
Begin by choosing a small, manageable site that you pass by every day. Observe how many hours of direct sunlight it receives (morning vs. afternoon), verify that rainwater drains away rather than forming a standing puddle, and learn your local average last spring frost date. Then select 3 to 5 beginner-friendly flower varieties whose light, soil, and space needs match that exact spot.
02What flowers should a beginner plant first?
For full sun (6+ hours direct sunlight), French marigolds, zinnias, purple coneflowers, and black-eyed susans are proven, high-reward options. For partial shade (4 to 6 hours sun, especially cool morning sun), hostas, coral bells, and wax begonias perform reliably. Beginners should start with container-grown nursery transplants rather than starting tiny seeds indoors.
03Should I plant annuals or perennials in my first flower bed?
The most successful beginner flower beds combine both. Annuals (like marigolds and zinnias) provide immediate, non-stop colorful blooms from June until the first autumn freeze, giving you fast visual reward. Perennials (like coneflowers and black-eyed susans) establish deep root systems and return year after year, building a permanent garden backbone.
04How much sun do flowers really need?
It depends strictly on the flower species. Plants labeled 'Full Sun' require 6 to 8 or more hours of direct, unfiltered sunlight daily to produce prolific blooms. 'Part Sun' or 'Part Shade' flowers need approximately 4 to 6 hours (ideally cool morning sunlight with protection from blistering afternoon heat). 'Shade' plants thrive with less than 4 hours of direct sun and prefer ambient reflected light.
05What is the easiest flower to grow from seed?
Zinnias and sunflowers are the easiest flowers for beginners to grow from seed directly in the garden. Both have large seeds that are easy to handle, germinate rapidly in warm soil (5 to 10 days), and require zero specialized indoor lighting setups. Direct sow them outdoors about 1 to 2 weeks after all danger of spring frost has passed.
06When is it safe to plant flowers outside in spring?
It is safe to plant cold-hardy annuals (like pansies and sweet peas) 4 to 6 weeks before your average last spring frost. However, tender warm-season flowers (like zinnias, petunias, begonias, and marigolds) must wait until after all statistical frost risk has passed and the soil temperature reaches at least 65°F. Never plant tender flowers solely because the calendar reaches a specific date.
07How far apart should flowers be planted?
Always space flowers based on their mature spread listed on the nursery plant tag, NOT their small size in the 4-inch nursery pot. For example, if a black-eyed susan tag indicates a mature width of 18 inches, place plants 18 inches apart measured from center to center. The open space between young plants will fill in naturally as they mature.
08Do I need to test my soil before planting flowers?
Testing your soil through your local county Cooperative Extension office is highly recommended before buying expensive amendments or synthetic fertilizers. A standard soil test reveals your soil's pH (acidity) and nutrient levels, telling you exactly what amendments are needed rather than guessing and potentially over-fertilizing your flowers.
09Should I put mulch in a new flower bed?
Yes. Spreading a 2-inch blanket of organic hardwood mulch across exposed soil between new flowers cools root temperatures, conserves soil moisture so you water less, suppresses weed seeds, and prevents heavy rain from splashing muddy fungal spores onto leaves. Keep mulch 1 to 2 inches away from plant stems to prevent crown rot.
10How often should new flowers be watered?
There is no single calendar schedule for watering. New transplants generally need moisture monitoring every 1 to 2 days during their first week while roots are confined to the original pot ball. After week one, use the 'finger test': insert your finger 2 inches into the soil. If it feels cool and damp, wait. If it feels dry, water deeply at the base until the root zone is thoroughly soaked.
11How deep should I dig the hole when planting flowers?
Dig the planting hole twice as wide as the nursery container, but exactly the same depth as the pot. The top of the plant's root ball should sit completely level with the surrounding garden soil. Planting too deep suffocates root crowns and invites rot; planting too high causes the root ball to dry out rapidly in the wind.
12Why are my newly planted flowers wilting in the sun?
Newly transplanted flowers frequently experience 'transplant shock' during their first week because their root system has not yet grown outward into the surrounding soil. When bright midday sun and heat cause leaves to lose water faster than roots can absorb it, temporary afternoon wilting occurs. If soil is damp, they will perk back up by evening as temperatures cool.
13What does 'deadheading' mean and do I have to do it?
Deadheading is the simple practice of snipping off faded or dead flower heads before they can form seeds. For many annuals (such as marigolds, zinnias, and petunias), deadheading signals the plant to produce a fresh wave of flower buds instead of spending energy making seeds. Not all flowers require it, but it significantly extends the blooming season.
14Can I start a flower garden in containers instead of digging up my yard?
Yes! Container flower gardening is an ideal, low-commitment starting point for beginners, renters, or homes with heavy clay soil. Choose a 14-to-20-inch pot with bottom drainage holes, fill it with quality commercial potting mix (never dense garden topsoil), and group 3 compatible flowers together. Keep in mind that pots dry out much faster than ground beds in hot summer weather.
15What is the difference between a flower bed and a flower border?
A flower border is typically viewed from only one side, positioned against a house foundation, wooden fence, or walkway, and arranged with tall plants in the back stepping down to low plants in front. A flower bed (or island bed) is often freestanding in a lawn, viewed from all 360 degrees, with the tallest plants anchoring the center and stepping down in all directions.
16What should I do if a flower starts turning yellow?
First check the soil moisture. In 80% of beginner gardens, yellow lower leaves are caused by overwatering or poor drainage, which suffocates roots and prevents nitrogen absorption. If the soil is constantly saturated, stop watering and let the top 2 inches dry out completely. If the soil is bone dry, provide a deep, slow watering at the plant's base.
What to Learn Next on Your Gardening Journey
Now that you understand the fundamentals of site evaluation, plant labels, and basic care, explore these deep-dive guides to master specific garden design topics:
Month-by-Month Flower Planting Guide (Full USA Calendar by Frost Date).
How to Design BedsFront Yard Flower Bed Ideas: Layout formulas, color palettes, and curb appeal.
Native FlowersNative Plant Landscaping: Ecoregional perennials that support pollinators.
Attract PollinatorsPollinator Garden Ideas: Nectar flowers for butterflies, bees, and hummingbirds.
Living MulchGround Cover Plants: Low-growing flowering carpets that choke out weeds.
Calculate MulchMulch Calculator: Estimate exact cubic yards and bags needed for your bed.
Planting Flowers in Peabody, MA & Coastal Essex County
For homeowners in Peabody, Danvers, Salem, Beverly, and Lynnfield (USDA Hardiness Zone 6b/7a), coastal Massachusetts presents unique growing conditions:
- Spring Frost Window: Average last spring frost occurs between May 5 and May 12. Wait until mid-May before planting tender summer annuals like zinnias and impatiens.
- Acidic Glacial Till Soils: North Shore soils naturally trend acidic (pH 5.5 to 6.2). Cold-hardy perennials like Black-Eyed Susans, Coneflowers, and Astilbes thrive, but lavender and delphiniums benefit from garden compost to buffer acidity.
- Winter Snowpack & Salt Spray: Along front walkways and driveways, select salt-tolerant flowering perennials and avoid planting delicate perennials right where snow blowers discharge compacted salt-treated snow.
Planning a Larger Flower Bed or Complete Landscape?
Connect with trusted local landscaping, planting, and hardscape specialists serving Peabody and Essex County. Get straightforward estimates and expert advice tailored to your site's unique sunlight and soil.
Get connected with an independent local landscaping professional. Calls go to (877) 537-6896.